

How To Repair Water Damaged Hardwood Floors?
Hardwood floors add timeless beauty and value to a home, but water damage can threaten their longevity. Whether it’s a minor spill or severe flooding, water can cause warping, discoloration, and even structural issues. But don’t worry—damaged hardwood floors can often be repaired with the right approach.
This guide will explain how to identify and repair water damaged hardwood floors step by step. Here’s what we’ll cover:
- Signs of water damage in hardwood floors
- Steps to repair water damaged hardwood floors
- Tips to prevent future damage
⚠️ Signs of Water Damage in Hardwood Floors

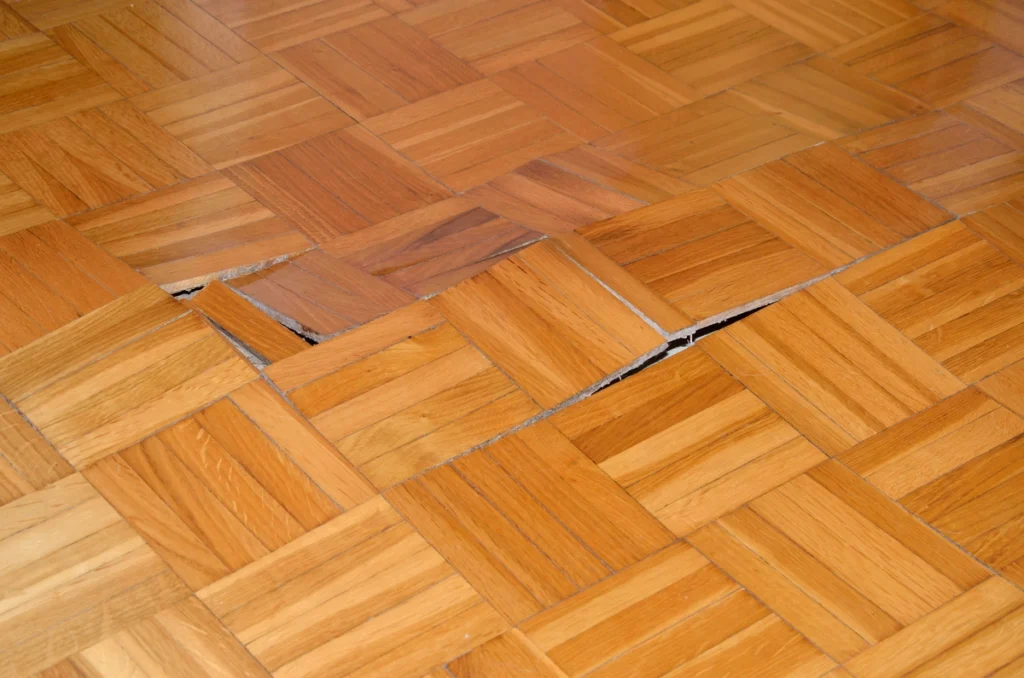
To begin repairs, you’ll first need to understand the extent of the damage. Common signs of water damage include cupping or warping, where boards swell and create raised or uneven edges. Severe water exposure can also lead to buckle formation, causing floors to lift entirely. Discoloration, such as dark spots, white patches, or fading, is another indication of moisture trapped in the wood.
Other signs to watch for include softened wood, as water can weaken its integrity over time. Mold growth is also a clear indicator, often accompanied by visible spores or a musty smell, signaling prolonged water exposure. Identifying these signs early is crucial for effective repairs.
Causes of Hardwood Floor Water Damage
Understanding what caused the damage ensures you can prevent similar problems in the future. Common culprits include:
- Leaks: Plumbing leaks from pipes, dishwashers, or refrigerators can seep into flooring.
- Flooding: Whether from heavy rains or HVAC failure, floods are a primary cause of floor damage.
- Spills: Small spills that aren’t cleaned up quickly can eventually soak into wood.
- Improper Cleaning: Using too much water for cleaning hardwood can saturate and damage it.
- Humidity: Prolonged exposure to high humidity levels can cause wood to swell over time.
✅ 6 Steps to Repair Water Damaged Hardwood Floors
Repairing water damaged hardwood floors requires a combination of patience and the right tools. Follow these six steps to address the issue effectively:
1. Stop the Source of Water
Before repairing your floors, it’s crucial to address the source of the water to prevent any further damage. Whether it’s a leaking pipe, a faulty appliance, or a damaged roof, ensure the problem is fully resolved before moving forward with repairs. Taking this step first will help you avoid recurring issues and protect your flooring in the long run.
2. Dry the Affected Area
Once the source of the water has been stopped, the next step is thoroughly drying the affected area. This can be achieved using methods such as circulating air with fans or blowers, running a dehumidifier to lower moisture levels, or, in cases of severe flooding, calling in professionals who have industrial drying equipment. Acting quickly is essential, as prompt drying can often save you from needing to replace the flooring entirely.
3. Assess the Damage
After the area is dry, carefully inspect your floors to evaluate how badly they have been damaged. Light surface damage may require only sanding and refinishing, while more severe issues, such as warped or moldy boards, will likely need replacement. If you are uncertain about the extent of the damage, consider consulting a flooring specialist for a professional assessment. This step will help you understand the scope of the repair work needed.
4. Remove Damaged Boards
If some boards are beyond repair, they will need to be removed. Using a pry bar, carefully take out the damaged planks without causing harm to surrounding areas. Once the boards are removed, sand and smooth the exposed subfloor to prepare it for the installation of new boards. Ensure that any moldy or severely warped wood is responsibly disposed of to prevent any further issues.
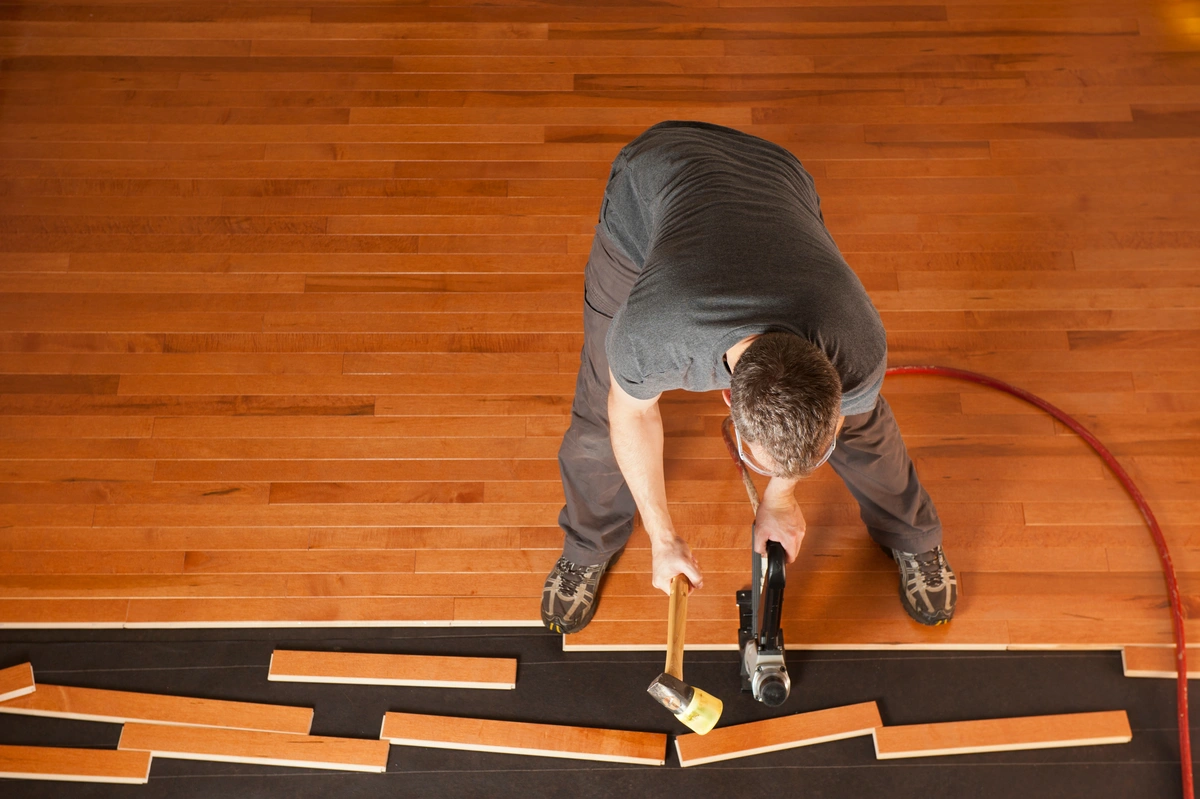
5. Install New Flooring
Replacing the damaged sections involves installing new hardwood pieces that match the existing flooring. Choose wood species and dimensions that are consistent with the rest of your floor for a cohesive look. Secure the new boards in place using adhesive or nails, ensuring that each plank fits tightly to create a seamless appearance. Taking care during this process will help achieve a professional finish.
6. Refinish the Floor
After the new boards have been installed, refinishing the floor is the final step. Start by sanding down the area to blend the newly installed boards with the existing flooring. Apply a matching stain and a protective sealant to ensure the finish is uniform. To complete the process, buff and polish the surface for a smooth, lustrous appearance that brings your floors back to life.
🤔 How To Prevent Future Hardwood Floor Water Damage

Repairs can be costly and time-consuming, so prevention is crucial. Follow these tips to protect your hardwood floors:
Use Rugs in High-Risk Areas
Placing rugs in areas prone to spills, such as entryways or kitchens, is an effective way to protect your floors. Rugs help absorb liquid quickly, reducing the risk of moisture seeping into the flooring. Choose rugs with non-slip backings to ensure they stay in place and provide added safety.
Address Leaks Immediately
Leaks, no matter how small, can cause significant damage if left unaddressed. The longer moisture sits, the greater the risk of it penetrating the flooring and leading to warping or mold growth. Be proactive by fixing leaks as soon as they’re discovered to protect your floors and ensure their longevity.
Control Indoor Humidity
High indoor humidity can wreak havoc on your floors, especially in humid climates. To maintain optimal conditions and prevent moisture buildup, consider using a dehumidifier. This simple step helps keep your floors in great shape and protects them from potential damage caused by excess humidity.
Seal Your Floors with Waterproof Finishes
Waterproof finishes act as a protective barrier, preventing water from penetrating your floors. By sealing your floors, you add an extra layer of protection against spills, leaks, and everyday wear and tear. Regular maintenance of these finishes is essential to keep your floors looking and performing their best over time.
Avoid Using Excess Water for Cleaning
When cleaning floors, less is more. Avoid soaking your floors with water, as this can lead to long-term damage. Instead, opt for damp mops or specialized hardwood floor cleaners that are designed to effectively clean without leaving excess moisture behind. This approach keeps your floors clean while safeguarding them from water-related issues.
👨🔧 Repair Water-Damaged Floors
When it comes to water-damaged hardwood floors, you need a team you can trust to bring your home back to its best. At Kraft Roofing, we combine years of experience, exceptional craftsmanship, and a commitment to customer satisfaction to deliver top-quality restoration services.
Whether it’s a small repair or a full restoration, we’re here to handle every step with care and precision. Don’t let water damage compromise the beauty and safety of your home—contact Kraft Roofing today for a free consultation and let us help you restore your floors with confidence!
Recent Articles POSTS


Work With the Team That’s Dedicated to Your Wins
